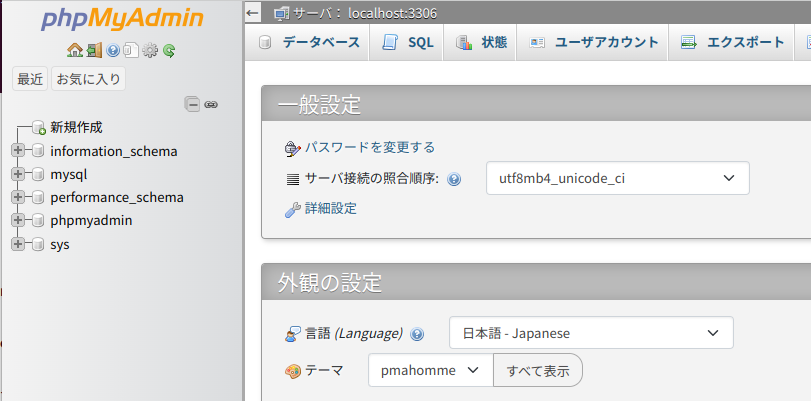
phpmyadminをインストール
はじめに
技適のあるRaspberry Pi 5とNvme baseを入手していたが、M.2規格のSSDの入手を手配していなかったので、放置していた。Amazonで一番安かったシリコンパワーの128GBのM.2を入手したので、稼働させた。タイトルにあるようにphpmyadminを稼働させる手順がメモになかったのでここに残すことにした。

状況確認
Raspberry Pi 5Bの.bash_historyにはmariadbをインストールした形跡はないものの、既にクライアントはインストールされているのね?
サーバーをインストールした記録がどこにもないな…
10:19 rpi@raspberrypi5b-alpha:~
$dpkg -l | grep maria
ii  libmariadb3:arm64     1:10.11.6-0+deb12u1     arm64        MariaDB database client library
ii  mariadb-common        1:10.11.6-0+deb12u1     all          MariaDB common configuration files
Raspberry Pi 4B gammaの.bash_historyの内容。
必要なもののインストール記録がほぼ残ってるが、設定の内容がわからんな。
sudo apt update
sudo apt install apache2
sudo apt install php php-dev php-fpm php-gd
sudo apt install libapache2-mod-php7.4
a2enmod proxy_fcgi setenvif
a2enconf php7.4-fpm
sudo systemctl restart apache2
sudo apt install mariadb-server mariadb-client
sudo apt install phpmyadmin
vi /etc/phpmyadmin/apache.conf
sudo vi /etc/phpmyadmin/apa
sudo systemctl restart apache2
sudo systemctl status apache2.service
sudo vi /etc/phpmyadmin/apache.conf
sudo vi /etc/apache2/apache2.conf
sudo systemctl restart apache2
sudo systemctl status apache2.service
インストール
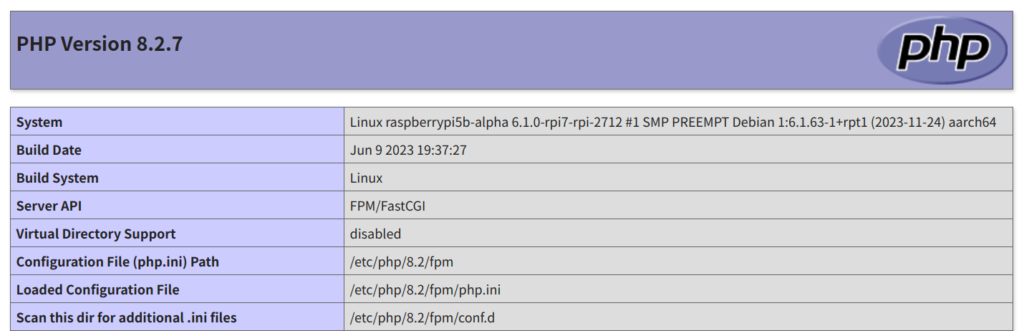
アパッチとPHPのインストール及び設定をしてみた、上記のsudoしていなかったけど、良かったんかな?phpのバージョンは変っているので、a2enconfの引数は変えないとだめだろうな。これ、どこにあるんだろう(dpkg -l | grep php で確認したらphp8.2-fpmがあった)。
10:35 rpi@raspberrypi5b-alpha:~
$sudo a2enmod proxy_fcgi setenvif
Considering dependency proxy for proxy_fcgi:
Enabling module proxy.
Enabling module proxy_fcgi.
Module setenvif already enabled
To activate the new configuration, you need to run:
  systemctl restart apache2

14:07 rpi@raspberrypi5b-alpha:/var/www/html
$sudo a2enconf php8.2-fpm
Enabling conf php8.2-fpm.
To activate the new configuration, you need to run:
  systemctl reload apache2
14:09 rpi@raspberrypi5b-alpha:/var/www/html
$sudo systemctl restart apache2
/var/www/html/info.php ファイルを作成、内容は次の通り。
<?php
 phpinfo();
?>
Webブラウザにアドレスを入力して確認。rasberrypi5b-alpha.local/info.php
次いで、mariadbとphpmyadminをインストール
14:11 rpi@raspberrypi5b-alpha:/var/www/html
$sudo apt install mariadb-server mariadb-client phpmyadmin
/etc/phpmyadmin/apache.conf を編集しているようだが、特に変更するところはなさそうだ。左がRaspberry Pi 4B gammaで右がRaspberry Pi 5 alpha の内容。php8の内容が増えているね。
# phpMyAdmin default Apache configuration

Alias /phpmyadmin /usr/share/phpmyadmin

<Directory /usr/share/phpmyadmin>
    Options SymLinksIfOwnerMatch
    DirectoryIndex index.php

    # limit libapache2-mod-php to files and directories necessary by pma
    <IfModule mod_php7.c>
        php_admin_value upload_tmp_dir /var/lib/phpmyadmin/tmp
        php_admin_value open_basedir /usr/share/phpmyadmin/:/usr/share/doc/phpmyadmin/:/etc/phpmyadmin/:/var/lib/phpmyadmin/:/usr/sh
    </IfModule>

</Directory>

# Disallow web access to directories that don't need it
<Directory /usr/share/phpmyadmin/templates>
    Require all denied
</Directory>
<Directory /usr/share/phpmyadmin/libraries>
    Require all denied
</Directory>
# phpMyAdmin default Apache configuration

Alias /phpmyadmin /usr/share/phpmyadmin

<Directory /usr/share/phpmyadmin>
    Options SymLinksIfOwnerMatch
    DirectoryIndex index.php

    # limit libapache2-mod-php to files and directories necessary by pma
    <IfModule mod_php7.c>
        php_admin_value upload_tmp_dir /var/lib/phpmyadmin/tmp
        php_admin_value open_basedir /usr/share/phpmyadmin/:/usr/share/doc/phpmyadmin/:/etc/phpmyadmin/:/var/lib/phpmyadmin/:/usr/sh
    </IfModule>

    # PHP 8+
    <IfModule mod_php.c>
        php_admin_value upload_tmp_dir /var/lib/phpmyadmin/tmp
        php_admin_value open_basedir /usr/share/phpmyadmin/:/usr/share/doc/phpmyadmin/:/etc/phpmyadmin/:/var/lib/phpmyadmin/:/usr/sh
    </IfModule>

</Directory>

# Disallow web access to directories that don't need it
<Directory /usr/share/phpmyadmin/templates>
    Require all denied
</Directory>
<Directory /usr/share/phpmyadmin/libraries>
    Require all denied
</Directory>
アパッチをリスタート、ステータスを確認
14:53 rpi@raspberrypi5b-alpha:~
$sudo systemctl restart apache2
14:53 rpi@raspberrypi5b-alpha:~
$sudo systemctl status apache2.service
● apache2.service - The Apache HTTP Server
     Loaded: loaded (/lib/systemd/system/apache2.service; enabled; preset: enabled)
     Active: active (running) since Mon 2024-03-25 14:53:34 JST; 20s ago
       Docs: https://httpd.apache.org/docs/2.4/
    Process: 57326 ExecStart=/usr/sbin/apachectl start (code=exited, status=0/SUCCESS)
   Main PID: 57332 (apache2)
      Tasks: 6 (limit: 9250)
        CPU: 93ms
     CGroup: /system.slice/apache2.service
             ├─57332 /usr/sbin/apache2 -k start
             ├─57365 /usr/sbin/apache2 -k start
             ├─57366 /usr/sbin/apache2 -k start
             ├─57368 /usr/sbin/apache2 -k start
             ├─57372 /usr/sbin/apache2 -k start
             └─57375 /usr/sbin/apache2 -k start

Mar 25 14:53:33 raspberrypi5b-alpha systemd[1]: Starting apache2.service - The Apache HTTP Server...
Mar 25 14:53:34 raspberrypi5b-alpha apachectl[57330]: AH00558: apache2: Could not reliably determine the server's fully qualified d>
Mar 25 14:53:34 raspberrypi
パスワードがわからない…
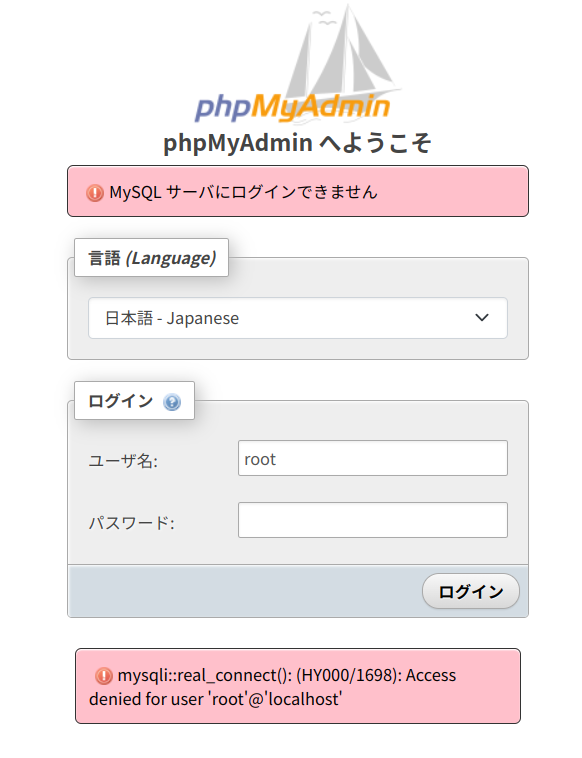
mariadbの設定
mariadbの設定が前後したようだ。
ここを参考にした。
15:05 rpi@raspberrypi5b-alpha:~
$sudo mysql_secure_installation

NOTE: RUNNING ALL PARTS OF THIS SCRIPT IS RECOMMENDED FOR ALL MariaDB
      SERVERS IN PRODUCTION USE!  PLEASE READ EACH STEP CAREFULLY!

In order to log into MariaDB to secure it, we'll need the current
password for the root user. If you've just installed MariaDB, and
haven't set the root password yet, you should just press enter here.

Enter current password for root (enter for none):
OK, successfully used password, moving on...

Setting the root password or using the unix_socket ensures that nobody
can log into the MariaDB root user without the proper authorisation.

You already have your root account protected, so you can safely answer 'n'.

Switch to unix_socket authentication [Y/n] n
 ... skipping.

You already have your root account protected, so you can safely answer 'n'.

Change the root password? [Y/n] y
New password:
Re-enter new password:
Password updated successfully!
Reloading privilege tables..
 ... Success!


By default, a MariaDB installation has an anonymous user, allowing anyone
to log into MariaDB without having to have a user account created for
them.  This is intended only for testing, and to make the installation
go a bit smoother.  You should remove them before moving into a
production environment.

Remove anonymous users? [Y/n] y
 ... Success!

Normally, root should only be allowed to connect from 'localhost'.  This
ensures that someone cannot guess at the root password from the network.

Disallow root login remotely? [Y/n] n
 ... skipping.

By default, MariaDB comes with a database named 'test' that anyone can
access.  This is also intended only for testing, and should be removed
before moving into a production environment.

Remove test database and access to it? [Y/n] y
 - Dropping test database...
 ... Success!
 - Removing privileges on test database...
 ... Success!

Reloading the privilege tables will ensure that all changes made so far
will take effect immediately.

Reload privilege tables now? [Y/n] y
 ... Success!

Cleaning up...

All done!  If you've completed all of the above steps, your MariaDB
installation should now be secure.

Thanks for using MariaDB!
設定ファイルの変更、
binde-addressの行をコメントアウトする。
15:14 rpi@raspberrypi5b-alpha:~
$sudo vi /etc/mysql/mariadb.conf.d/50-server.cnf
mariadbに接続して、外部からのアクセスを許可して、再起動。
15:17 rpi@raspberrypi5b-alpha:~
$mysql -u root -p
Enter password:
Welcome to the MariaDB monitor.  Commands end with ; or \g.
Your MariaDB connection id is 40
Server version: 10.11.6-MariaDB-0+deb12u1 Debian 12

Copyright (c) 2000, 2018, Oracle, MariaDB Corporation Ab and others.

Type 'help;' or '\h' for help. Type '\c' to clear the current input statement.

MariaDB [(none)]> grant all privileges on *.* to root@"%" identified by 'your password' with grant option;
Query OK, 0 rows affected (0.001 sec)

MariaDB [(none)]> exit;
Bye
15:18 rpi@raspberrypi5b-alpha:~
$sudo systemctl restart mysql
入れた!